Top Underwater Wide Angle Photography Techniques
{ "article": [ { "title": "Top Underwater Wide Angle Photography Techniques", "meta_description": "Learn how to capture expansive reefscapes and large marine animals with wide-angle lenses.", "content": "Learn how to capture expansive reefscapes and large marine animals with wide-angle lenses.\n\n
\n\n
Hey there, fellow ocean enthusiasts and aspiring underwater photographers! Ever looked at those breathtaking shots of vast coral gardens or majestic whale sharks and wondered, \"How do they do that?\" Well, chances are, they're rocking a wide-angle lens. Wide-angle photography underwater is all about capturing the grandeur of the marine environment – those sweeping reefscapes, massive schools of fish, or encounters with large pelagics. It's a completely different ballgame from macro, focusing on the big picture rather than the tiny details. If you're ready to expand your underwater photography horizons and start telling bigger stories with your camera, you've come to the right place. We're going to dive deep into the techniques, gear, and tips you need to master wide-angle underwater photography.
\n\nUnderstanding Wide Angle Lenses for Underwater Photography
\n\nFirst things first, let's talk about the star of the show: the wide-angle lens. Unlike standard lenses, wide-angle lenses have a shorter focal length, allowing them to capture a much broader field of view. This is crucial underwater because water acts like a giant magnifying glass, making everything appear closer and larger than it actually is. This phenomenon, known as refraction, effectively narrows your field of view. A wide-angle lens helps counteract this, letting you get closer to your subject while still capturing a lot of the surrounding environment. This proximity is key for clarity and color, as water absorbs light and color the further away you are from your subject.
\n\nFisheye Lenses vs Rectilinear Wide Angle Lenses for Underwater Photography
\n\nWhen it comes to wide-angle, you'll primarily encounter two types: fisheye and rectilinear. Both have their place, but they offer very different looks.
\n\n- \n
- Fisheye Lenses: These are ultra-wide lenses, typically offering a 180-degree or even wider field of view. Their defining characteristic is their curvilinear distortion, meaning straight lines appear curved, especially towards the edges of the frame. This can create a dramatic, immersive, and sometimes surreal effect. They're fantastic for capturing massive subjects like shipwrecks, large schools of fish, or getting incredibly close to a subject while still showing its environment. \n
- Rectilinear Wide-Angle Lenses: These lenses are designed to keep straight lines straight, minimizing distortion. They offer a wide field of view, but not as extreme as a fisheye. They're excellent for architectural shots (like wrecks where you want straight lines to remain straight), or when you want a more natural, less distorted look for your reefscapes or animal portraits. \n
Choosing between the two often comes down to personal preference and the specific shot you're aiming for. Many underwater photographers will have both in their kit for different situations.
\n\nEssential Gear for Wide Angle Underwater Photography
\n\nBeyond the camera body itself, a few key pieces of gear are absolutely essential for successful wide-angle underwater photography.
\n\nCamera Housing and Port Systems for Wide Angle Lenses
\n\nYour camera housing is your camera's lifeline underwater. For wide-angle, the port system is particularly critical. You'll typically need a dome port. Why a dome? Because a flat port, due to refraction, will actually narrow your field of view and introduce chromatic aberration (color fringing) at the edges with wide-angle lenses. A dome port helps to correct for this, maintaining the lens's true angle of view and minimizing distortion. Dome ports come in various sizes, and generally, larger domes offer better optical quality, especially for split shots (half in, half out of the water).
\n\nRecommended Dome Ports and Housings:
\n\n- \n
- Nauticam Wide Angle Conversion Port (WACP-1/2): These are revolutionary wet-mount wide-angle lenses that can be attached and removed underwater. They offer an incredibly wide field of view (up to 130 degrees with some lenses) with excellent corner sharpness and minimal distortion. They are compatible with a range of compact and mirrorless cameras. Price: ~$2,000 - $3,000 (lens only). Use Case: Ideal for photographers who want the flexibility to switch between macro and wide-angle on the same dive, or for those seeking the absolute best optical quality for their wide-angle shots. \n
- Ikelite 8-inch Dome Port: Ikelite offers robust and reliable housings and ports. Their 8-inch dome port is a popular choice for DSLR and mirrorless systems, providing excellent optical performance for wide-angle lenses. Price: ~$500 - $800 (port only). Use Case: A solid, versatile option for serious amateur and professional photographers using Ikelite housings. \n
- Fantasea-AOI UWL-09F Wide Angle Lens: This is a wet-mount wide-angle lens designed for compact cameras and some mirrorless systems. It offers a 130-degree field of view and is a great way to get into wide-angle without investing in a full dome port system. Price: ~$600 - $800. Use Case: Excellent for compact camera users looking to significantly expand their field of view and capture impressive wide-angle shots. \n
Underwater Strobes or Video Lights for Wide Angle Illumination
\n\nNatural light diminishes rapidly underwater, especially color. To bring back those vibrant blues, greens, and reds, you absolutely need artificial light. For wide-angle, strobes (flashes) are generally preferred for still photography, as they provide a burst of powerful light that can illuminate a large area. You'll typically want two strobes, positioned to the sides of your housing, to ensure even lighting and minimize backscatter (those annoying white dots caused by light reflecting off particles in the water).
\n\nRecommended Strobes:
\n\n- \n
- Inon Z-330 / D-200 Strobes: Inon strobes are renowned for their wide beam angle (110 degrees circular), powerful output, and fast recycle times. The Z-330 is their flagship model, offering exceptional performance. Price: ~$700 - $900 per strobe. Use Case: Professional and serious amateur photographers seeking top-tier performance and reliability for wide-angle and general underwater photography. \n
- Sea & Sea YS-D3 DUO Strobes: Sea & Sea strobes are another excellent choice, known for their robust build and consistent performance. The YS-D3 DUO offers a wide beam and good power. Price: ~$700 - $850 per strobe. Use Case: A strong contender for photographers who want powerful, reliable strobes with good battery life. \n
- Retra Flash PRO / Prime X: Retra strobes are gaining immense popularity for their innovative design, powerful output, and incredibly wide and even beam. They are a premium option. Price: ~$1,000 - $1,200 per strobe. Use Case: For the discerning professional or enthusiast who demands the absolute best in terms of light quality and performance. \n
For videography, continuous video lights are essential. Look for lights with a wide beam angle and high lumen output.
\n\nRecommended Video Lights:
\n\n- \n
- Keldan Luna 8 LA-V: Keldan lights are top-of-the-line, offering incredible brightness, wide beam angles, and excellent color rendition. Price: ~$2,000 - $3,000. Use Case: Professional videographers and those who demand the highest quality continuous lighting. \n
- Light & Motion Sola Video 3800 / 4000: These lights are compact, powerful, and offer a good balance of performance and portability. They have a wide, even beam. Price: ~$500 - $700. Use Case: Excellent for both still photographers needing focus lights and videographers looking for a versatile and reliable light source.
- Bigblue VL4200P: Bigblue lights offer a great lumen-to-price ratio, providing powerful illumination for their cost. Price: ~$300 - $400. Use Case: A more budget-friendly option for videographers or those needing a strong focus light for still photography. \n
Mastering Wide Angle Underwater Photography Techniques
\n\nNow that you've got the gear, let's talk about how to use it effectively to capture those stunning wide-angle shots.
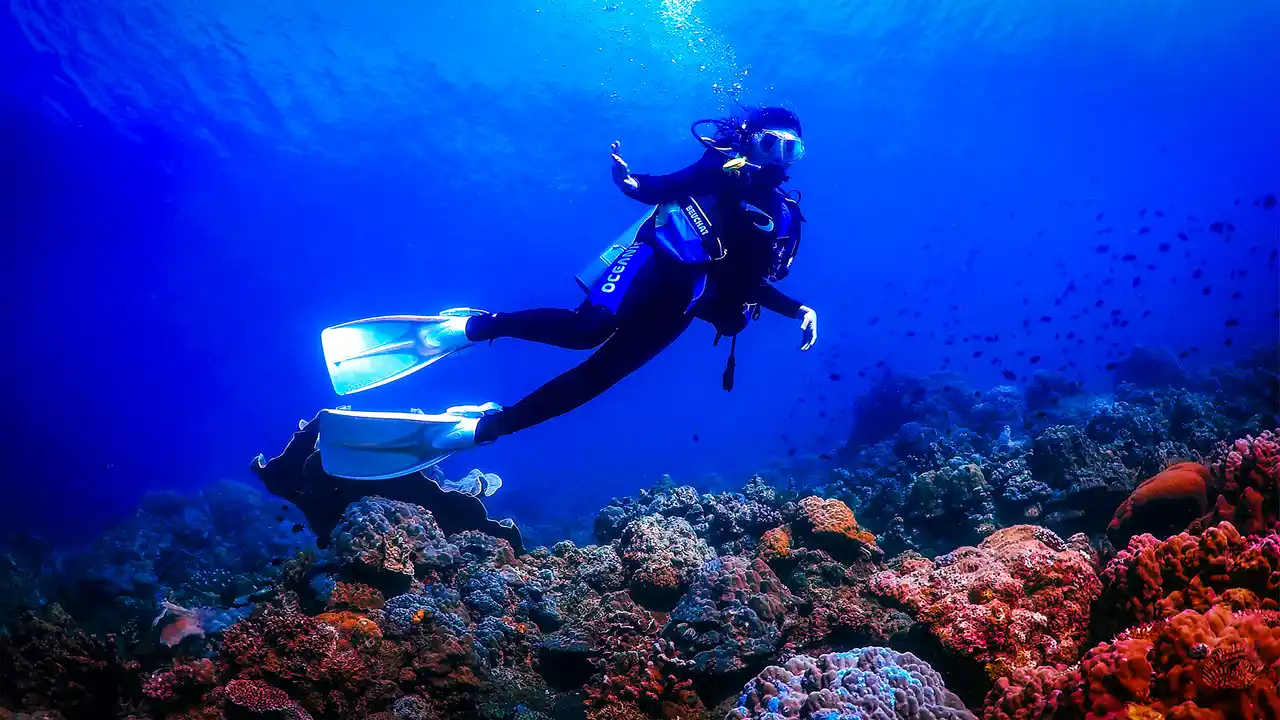
\n\nGetting Close and Personal with Your Subject for Wide Angle Shots
\n\nThis is arguably the most important rule in underwater photography, and it's even more critical for wide-angle. The closer you are to your subject, the less water there is between your lens and the subject. Less water means less light absorption, better clarity, and more vibrant colors. With a wide-angle lens, you can get incredibly close to a large subject (like a shark or a diver) and still capture a lot of the surrounding environment. Don't be afraid to get right up to that coral head or swim alongside that manta ray!
\n\nComposition for Expansive Underwater Scenes
\n\nComposition is key to making your wide-angle shots impactful. Think about leading lines, the rule of thirds, and creating depth in your images.
\n\n- \n
- Leading Lines: Use natural elements like reef formations, sand channels, or even schools of fish to draw the viewer's eye into the frame and towards your main subject. \n
- Rule of Thirds: Avoid placing your main subject dead center. Imagine a tic-tac-toe grid over your image and place your subject along the lines or at their intersections for a more dynamic composition. \n
- Creating Depth: Include elements in the foreground, mid-ground, and background to give your image a sense of three-dimensionality. A diver in the foreground, a coral bommie in the mid-ground, and the open blue in the background can create a powerful sense of depth. \n
- Negative Space: Sometimes, less is more. Using negative space (areas of open water) can emphasize your subject and create a sense of vastness. \n
Lighting Techniques for Wide Angle Underwater Photography
\n\nAs mentioned, artificial light is crucial. For wide-angle, the goal is to evenly illuminate your foreground subject while still capturing the ambient light of the background (the blue water).
\n\n- \n
- Strobe Placement: Position your strobes wide and slightly behind your dome port, pointing slightly outwards. This helps to illuminate your subject without lighting up the particles in the water directly in front of your lens (backscatter). Experiment with angles; a slight inward angle can help illuminate subjects closer to the center, while a wider angle is better for very broad scenes. \n
- Balancing Strobe Light with Ambient Light: This is the art of wide-angle photography. You want your strobes to light up your foreground subject and bring out its colors, but you also want to expose for the ambient blue water in the background. This is achieved by adjusting your camera's settings:
- Shutter Speed: Controls the amount of ambient light. A faster shutter speed (e.g., 1/125s or 1/160s) will make the background darker blue, while a slower shutter speed (e.g., 1/60s or 1/80s) will let in more ambient light, making the background brighter.
- Aperture (f-stop): Controls the depth of field and the amount of light from your strobes. A higher f-stop (e.g., f/8, f/11) will give you a greater depth of field (more of the image in focus) and will require more strobe power. A lower f-stop (e.g., f/4, f/5.6) will give you a shallower depth of field and require less strobe power.
- ISO: Keep your ISO as low as possible (e.g., ISO 100, 200) to minimize noise, especially in the blue background.
\n - Manual Strobe Power: While TTL (Through-The-Lens) can be convenient, manual strobe power gives you ultimate control. Start with a moderate power setting and adjust based on your subject's distance and the desired exposure. \n
Focusing and Depth of Field in Wide Angle Underwater Photography
\n\nWith wide-angle lenses, you generally want a large depth of field to keep as much of the scene in focus as possible. This means using a higher f-stop (smaller aperture opening), typically f/8 to f/16. For focusing, pre-focusing on a point about one-third into your scene can often work well, or use your camera's autofocus on your main subject. Given the wide depth of field, precise focusing is often less critical than with macro, but still important for sharpness.
\n\nAdvanced Wide Angle Techniques and Considerations
\n\nOnce you've got the basics down, you can start experimenting with more advanced techniques.
\n\nSplit Shots Over Under Photography
\n\nSplit shots, or over-unders, are those captivating images that show both the underwater world and the surface world in a single frame. They require a large dome port (the bigger, the better for a clean waterline) and calm conditions. The key is to get half your dome port above the water and half below, ensuring your focus is sharp on both the underwater and above-water elements. This often requires a higher f-stop to maximize depth of field.
\n\nSunball and Sunburst Effects in Wide Angle Shots
\n\nCapturing the sun in your wide-angle shots can add a dramatic element. To get a sunball (a clear, defined circle of the sun), you'll need to shoot towards the sun with a high f-stop (e.g., f/16 or higher) and a fast shutter speed. For a sunburst (where the sun appears to have rays), you'll need an even higher f-stop (e.g., f/22) and a clean lens. Be careful not to look directly at the sun through your viewfinder for extended periods.
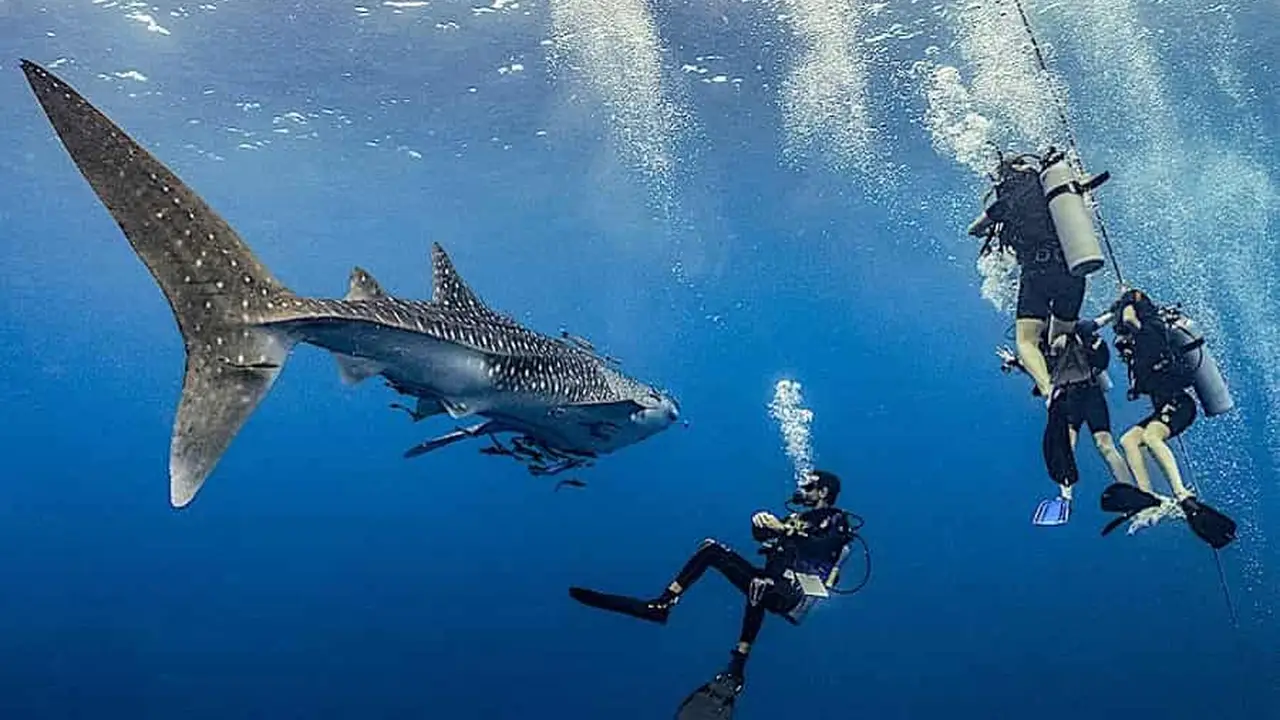
\n\nWorking with Large Marine Animals and Wide Angle Lenses
\n\nPhotographing large marine animals like sharks, manta rays, or whales with a wide-angle lens is incredibly rewarding. The key is patience, respect for the animal, and getting close without disturbing them. Anticipate their movements, try to get eye-level, and use their natural behavior to create dynamic compositions. Remember, the closer you are, the better the colors and clarity will be.
\n\nPost-Processing for Wide Angle Underwater Photos
\n\nEven with perfect technique, post-processing is an essential part of bringing out the best in your wide-angle images. Software like Adobe Lightroom or Photoshop can help you:
\n\n- \n
- Adjust White Balance and Color Correction: Bring back those lost reds and oranges. \n
- Correct Lens Distortion: Especially for fisheye lenses, you might want to subtly correct some of the curvature. \n
- Remove Backscatter: Use the spot healing brush or clone stamp tool to eliminate those distracting particles. \n
- Enhance Contrast and Clarity: Make your images pop. \n
- Crop and Straighten: Refine your composition. \n
Common Challenges and Troubleshooting in Wide Angle Underwater Photography
\n\nIt's not always smooth sailing. Here are some common issues you might encounter and how to fix them.
\n\nDealing with Backscatter in Wide Angle Images
\n\nBackscatter is the bane of every underwater photographer's existence. It's caused by your strobe light reflecting off particles in the water. To minimize it:
\n\n- \n
- Strobe Placement: As discussed, position your strobes wide and slightly behind your dome port. \n
- Clean Water: Choose dive sites with good visibility. \n
- Avoid Kicking Up Sediment: Maintain excellent buoyancy control. \n
- Post-Processing: Use editing software to remove remaining backscatter. \n
Achieving Sharpness Across the Frame with Wide Angle Lenses
\n\nSometimes, especially with dome ports, you might notice softness at the edges of your wide-angle images. This can be due to:
\n\n- \n
- Lens Choice: Some wide-angle lenses perform better than others with dome ports. \n
- Port Choice: Larger, higher-quality dome ports generally offer better corner sharpness. \n
- Focusing: Ensure your focus point is accurate. \n
- Aperture: Using a higher f-stop (e.g., f/11 or f/16) will increase your depth of field and can help with overall sharpness. \n
Managing Ambient Light and Strobe Power Balance
\n\nGetting the right balance between the blue background and your illuminated foreground can be tricky. If your background is too dark, slow down your shutter speed. If it's too bright, speed it up. If your foreground is too dark, increase strobe power or open your aperture. If it's too bright, decrease strobe power or close your aperture. It's a dance between these settings, and practice makes perfect.
\n\nCondensation and Fogging Inside the Housing
\n\nThis is a nightmare scenario. Condensation usually occurs when there's a temperature difference between the inside and outside of your housing, or if there's moisture trapped inside. To prevent it:
\n\n- \n
- Use Desiccants: Place silica gel packets inside your housing. \n
- Assemble in a Dry, Cool Environment: Avoid assembling your housing in humid conditions. \n
- Check O-rings: Ensure they are clean and properly seated. \n
Wide-angle underwater photography is a challenging but incredibly rewarding genre. It allows you to capture the vastness and beauty of the underwater world in a way that macro photography simply can't. By understanding your gear, mastering composition and lighting techniques, and practicing regularly, you'll be well on your way to creating stunning wide-angle images that truly tell the story of the ocean's grandeur. So grab your gear, dive in, and start exploring the big picture!
" } ] }:max_bytes(150000):strip_icc()/277019-baked-pork-chops-with-cream-of-mushroom-soup-DDMFS-beauty-4x3-BG-7505-5762b731cf30447d9cbbbbbf387beafa.jpg)